The Faroe Islands are a dream for landscape photographers. In this guide, I share 6 stunning Faroe Islands photo spots I explored during my road trip, with tips on how I captured each one through light, mood, and composition.
In this article, I share 6 stunning photo spots I explored during my road trip, with tips on how I captured them through light, mood and composition.
Whether you are planning your first visit or simply dreaming of going one day, I hope this guide will help you prepare and inspire you to photograph these dramatic landscapes in your own way.
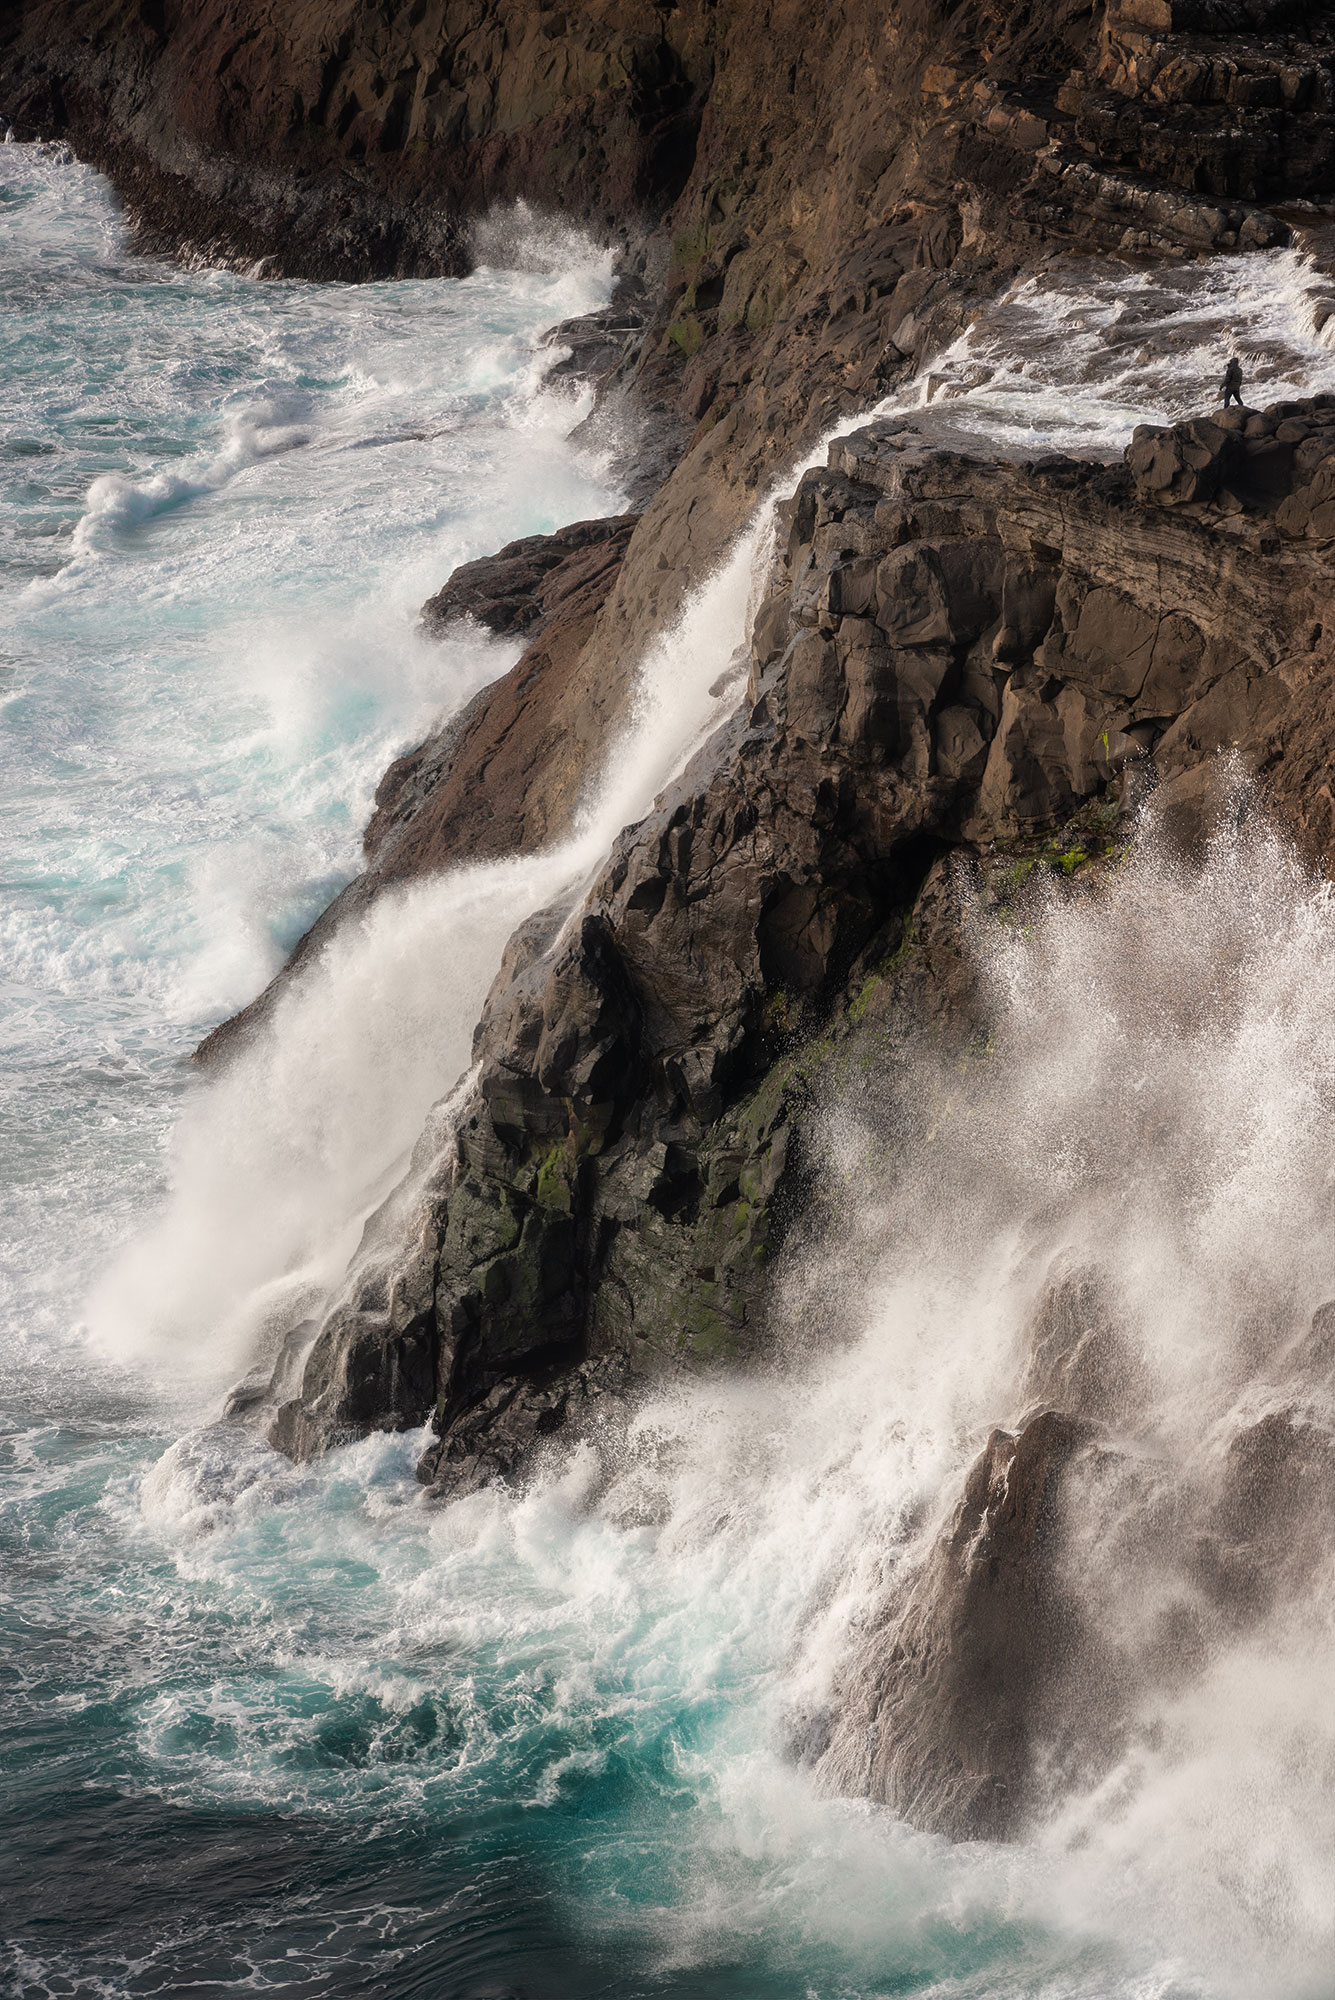
Bøsdalafossur Waterfall, Vágar Island
On the edge of the Atlantic Ocean, Bøsdalafossur waterfall tumbles from Lake Leitisvatn in a dramatic drop into the sea. Located on Vágar Island, this powerful cascade connects the calm of the lake to the open ocean, where waves crash against the cliffs with unpredictable force.
The waterfall is about 30 metres high and best visited on a moody day, when sea spray and shifting clouds bring the scene to life. Depending on the weather, the water seems to disappear into mist or roar in a stormy fall.
How to get there
To reach the waterfall, follow the hiking trail that runs along Lake Leitisvatn from the village of Miðvágur. You can park your car at the trailhead parking lot in Miðvágur, right next to the lake. A small entrance fee is required at the start of the trail.
The walk is mostly flat and easy, following the shoreline of the lake. It takes about one hour to reach the cliffs where Bøsdalafossur pours into the ocean.
➜ Trailhead parking on Google Maps
How I photographed this scene
I wanted to show the height and power of the waterfall, with the waves crashing at the base. Since the light was quite strong and the scale difficult to grasp, I added a silhouette of my friend in post-processing. It helps to give a sense of dimension and presence in this vast landscape.
My gear
✅ Nikon D810
✅ Nikkor 80–200mm f/2.8
✅ Manfrotto tripod
Camera settings
ISO 160 — f/13 — 1/160 second
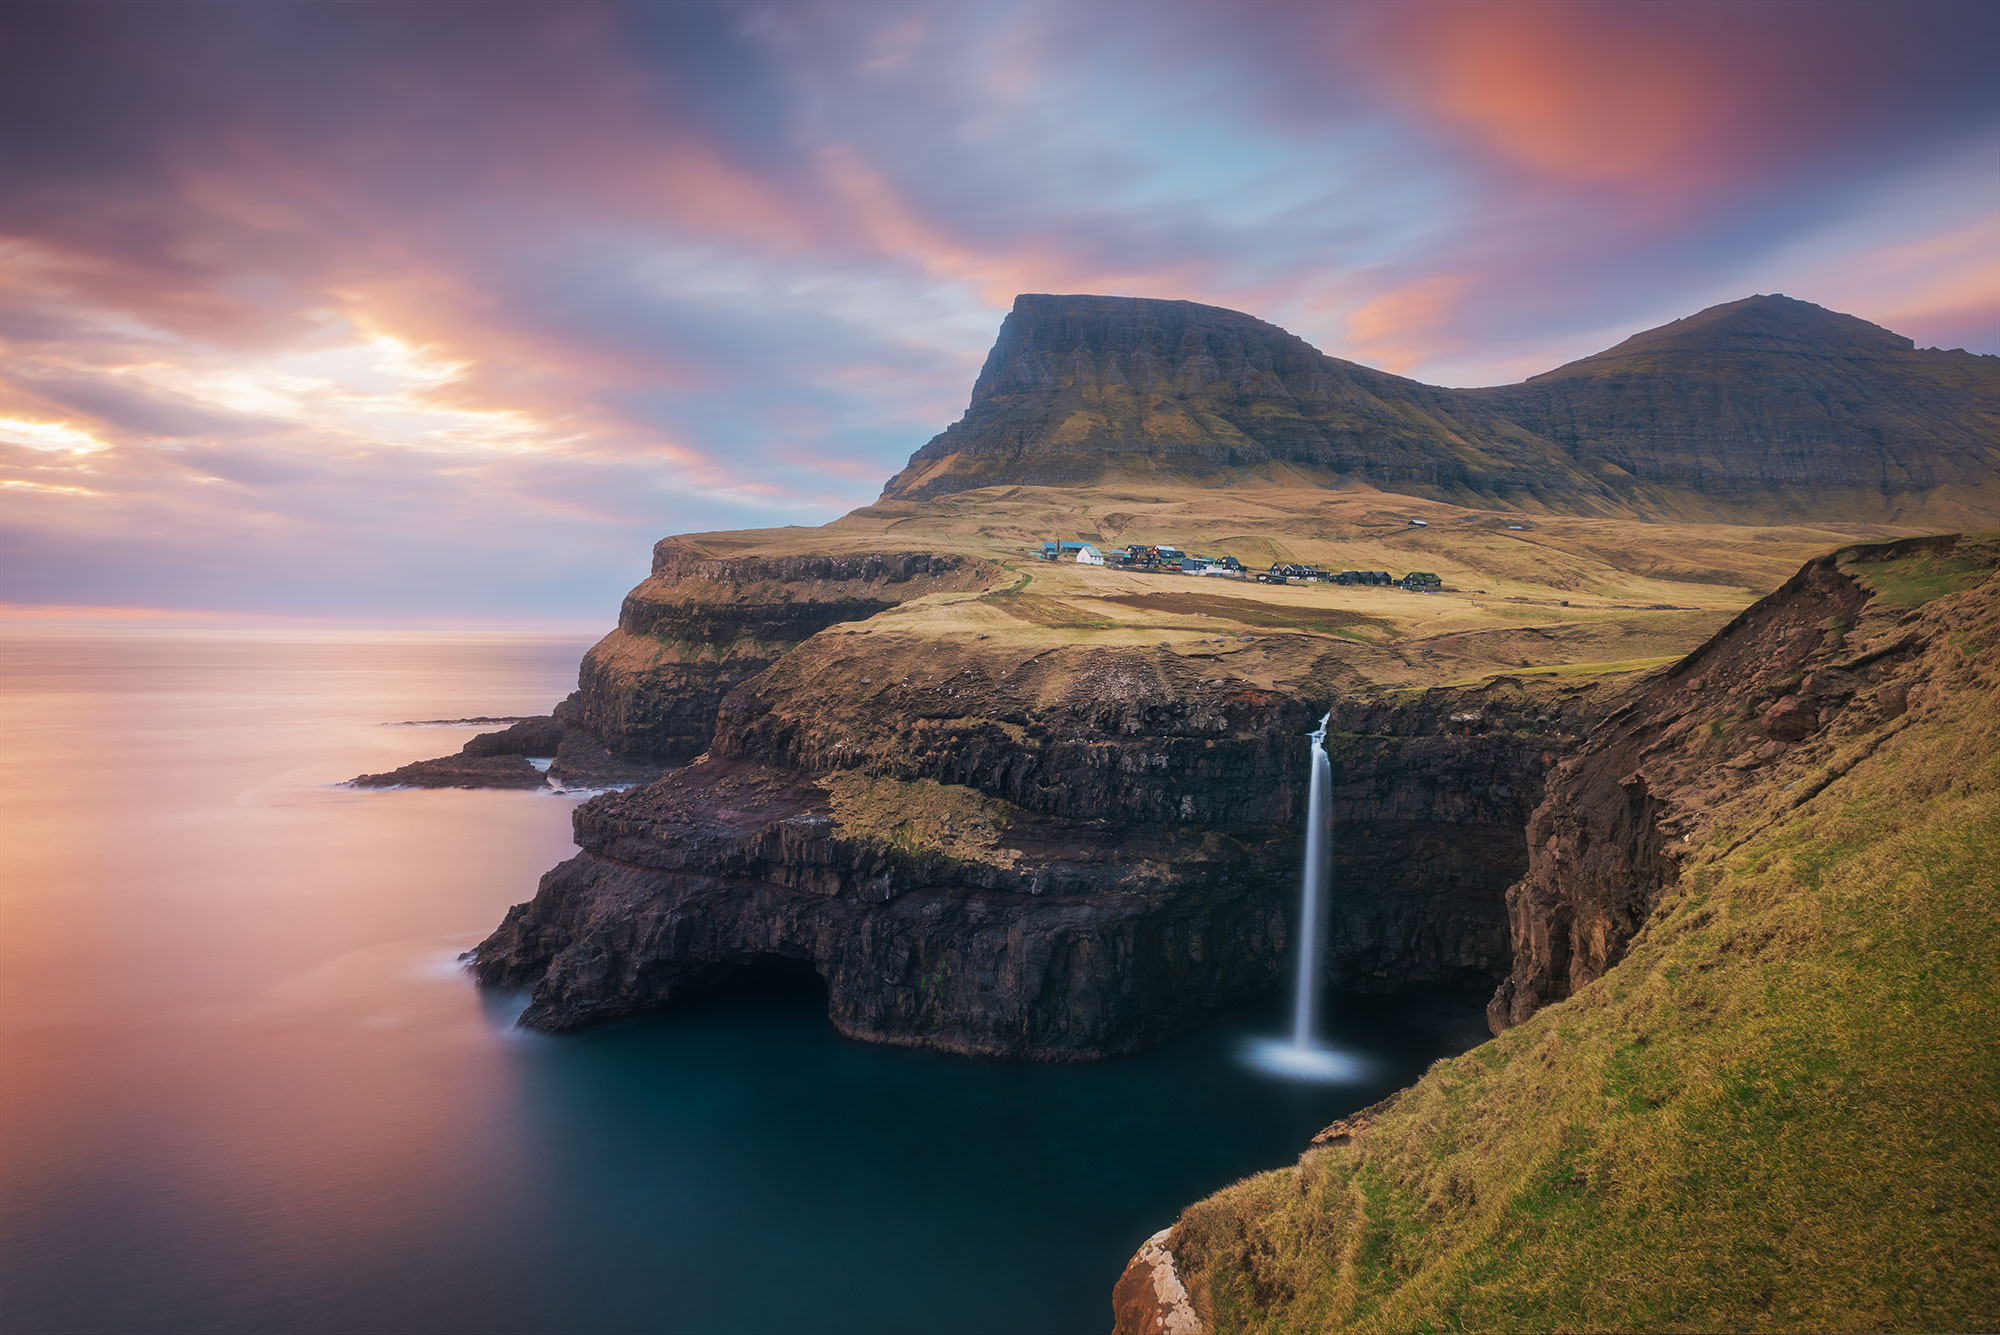
Múlafossur Waterfall, Gásadalur
This is the most iconic waterfall in the Faroe Islands. Múlafossur drops straight into the ocean, right at the edge of the remote village of Gásadalur. With its cliffs, soft light and dramatic skies, it’s a dream for any landscape photographer. Whether you love long exposure, golden hour or simply moody scenes, this place has it all.
The site is very photogenic at sunset, but also worth visiting under changing weather or cloudy skies. If you can, return more than once to capture different moods.
How to get there
Located just 20 minutes from Vágar Airport, Múlafossur is one of the easiest waterfalls to access in the Faroe Islands. You can park your car in the centre of the village of Gásadalur, then walk for a few minutes along the main path. The terrain is flat and straightforward.
If you want a peaceful experience and time to set up your composition, arrive early. This is a popular spot, especially in the evening.
➜ Parking location in Gásadalur on Google Maps
How I photographed this scene
About an hour before sunset, I set up my tripod on the cliffside, near the stone steps at the end of the path. This gave me time to frame the village and the waterfall in one clean composition.
I used a long exposure to capture soft movement in the water and clouds, adding contrast and a dreamy atmosphere to the image.
My gear
✅ Nikon D810
✅ Nikkor 20mm f/2.8
✅ Manfrotto tripod
✅ ND1000 filter
Camera settings
ISO 125 — f/11 — 88 seconds
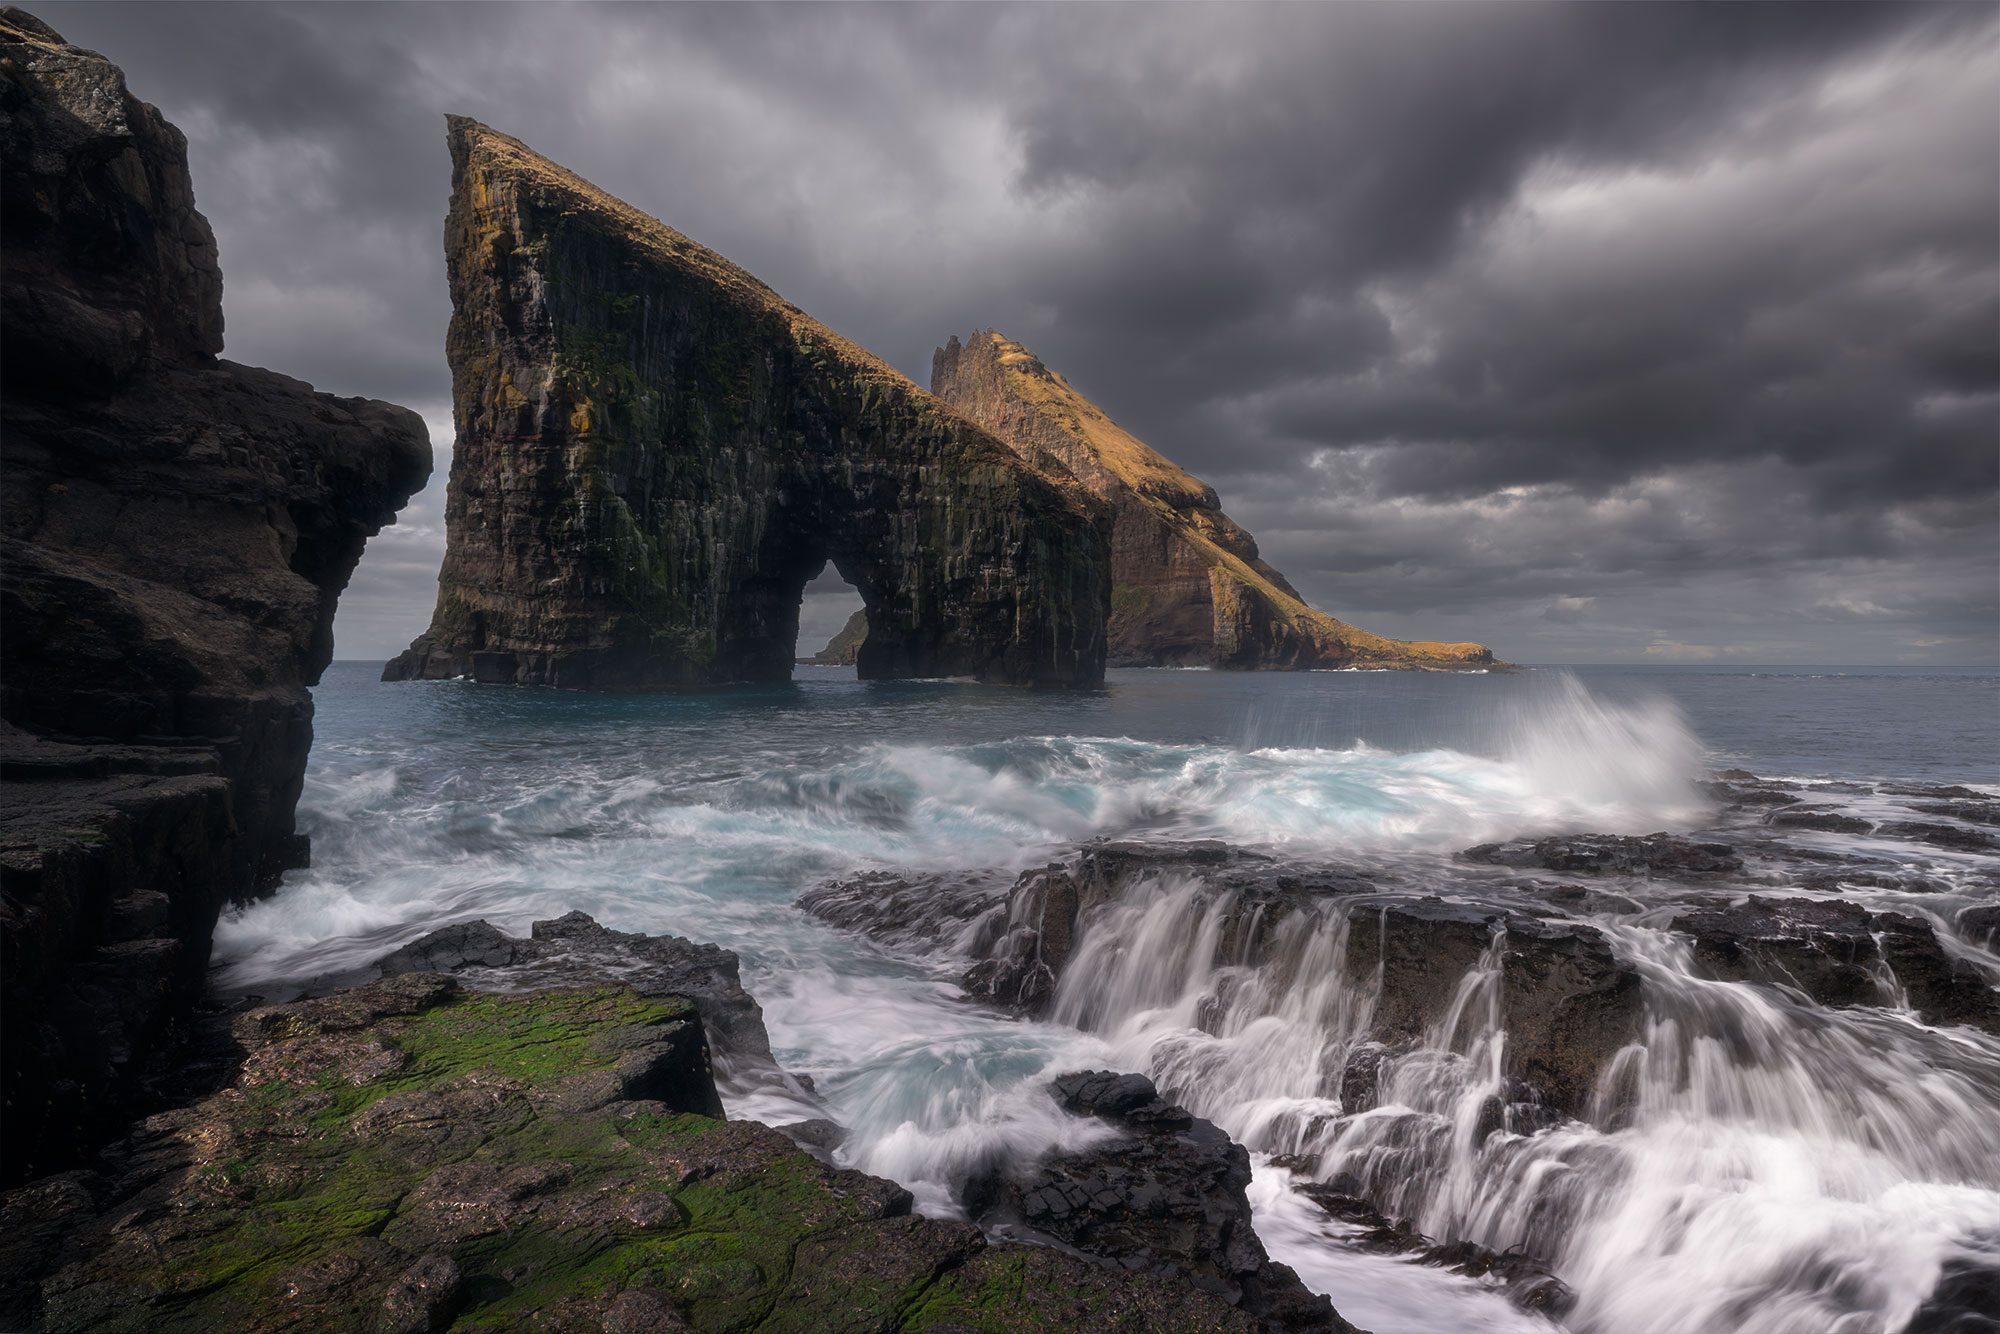
Drangarnir Sea Arch, Vágar Island
To me, this sea arch is the symbol of the Faroe Islands. It’s remote, wild, sculpted by the ocean — the kind of place that landscape photographers dream of. I had imagined this view for months, and thanks to a rare moment of good weather, I was lucky enough to capture it on my second day.
Framed by the Atlantic and carved by time, Drangarnir is a truly dramatic sight. The moment you see the arch rising from the sea, with Tindhólmur in the background, you know you’re somewhere unforgettable.
How to get there
To reach Drangarnir, I booked the Combined Boat Tour & Hike to Drangarnir Sea Arch via Guide to Faroe Islands. The boat departs from the port of Sørvágur and takes about ten minutes.
Once you arrive, the guide drops you near the arch, where you have around two hours to walk around and take photos from different angles.
➜ Boat and hike tour to Drangarnir Sea Arch
How I photographed this scene
My favourite photo was taken from the shoreline. I set up my tripod on the rocks and captured several long exposures to later stack in Photoshop. The mist in the air, the power of the sea, and the clean shapes of the cliffs created the perfect contrast.
My gear
✅ Nikon D810
✅ Nikkor 20mm f/2.8
✅ Manfrotto tripod
✅ ND64 filter
Camera settings
ISO 31 – f/22 – 0.2 seconds
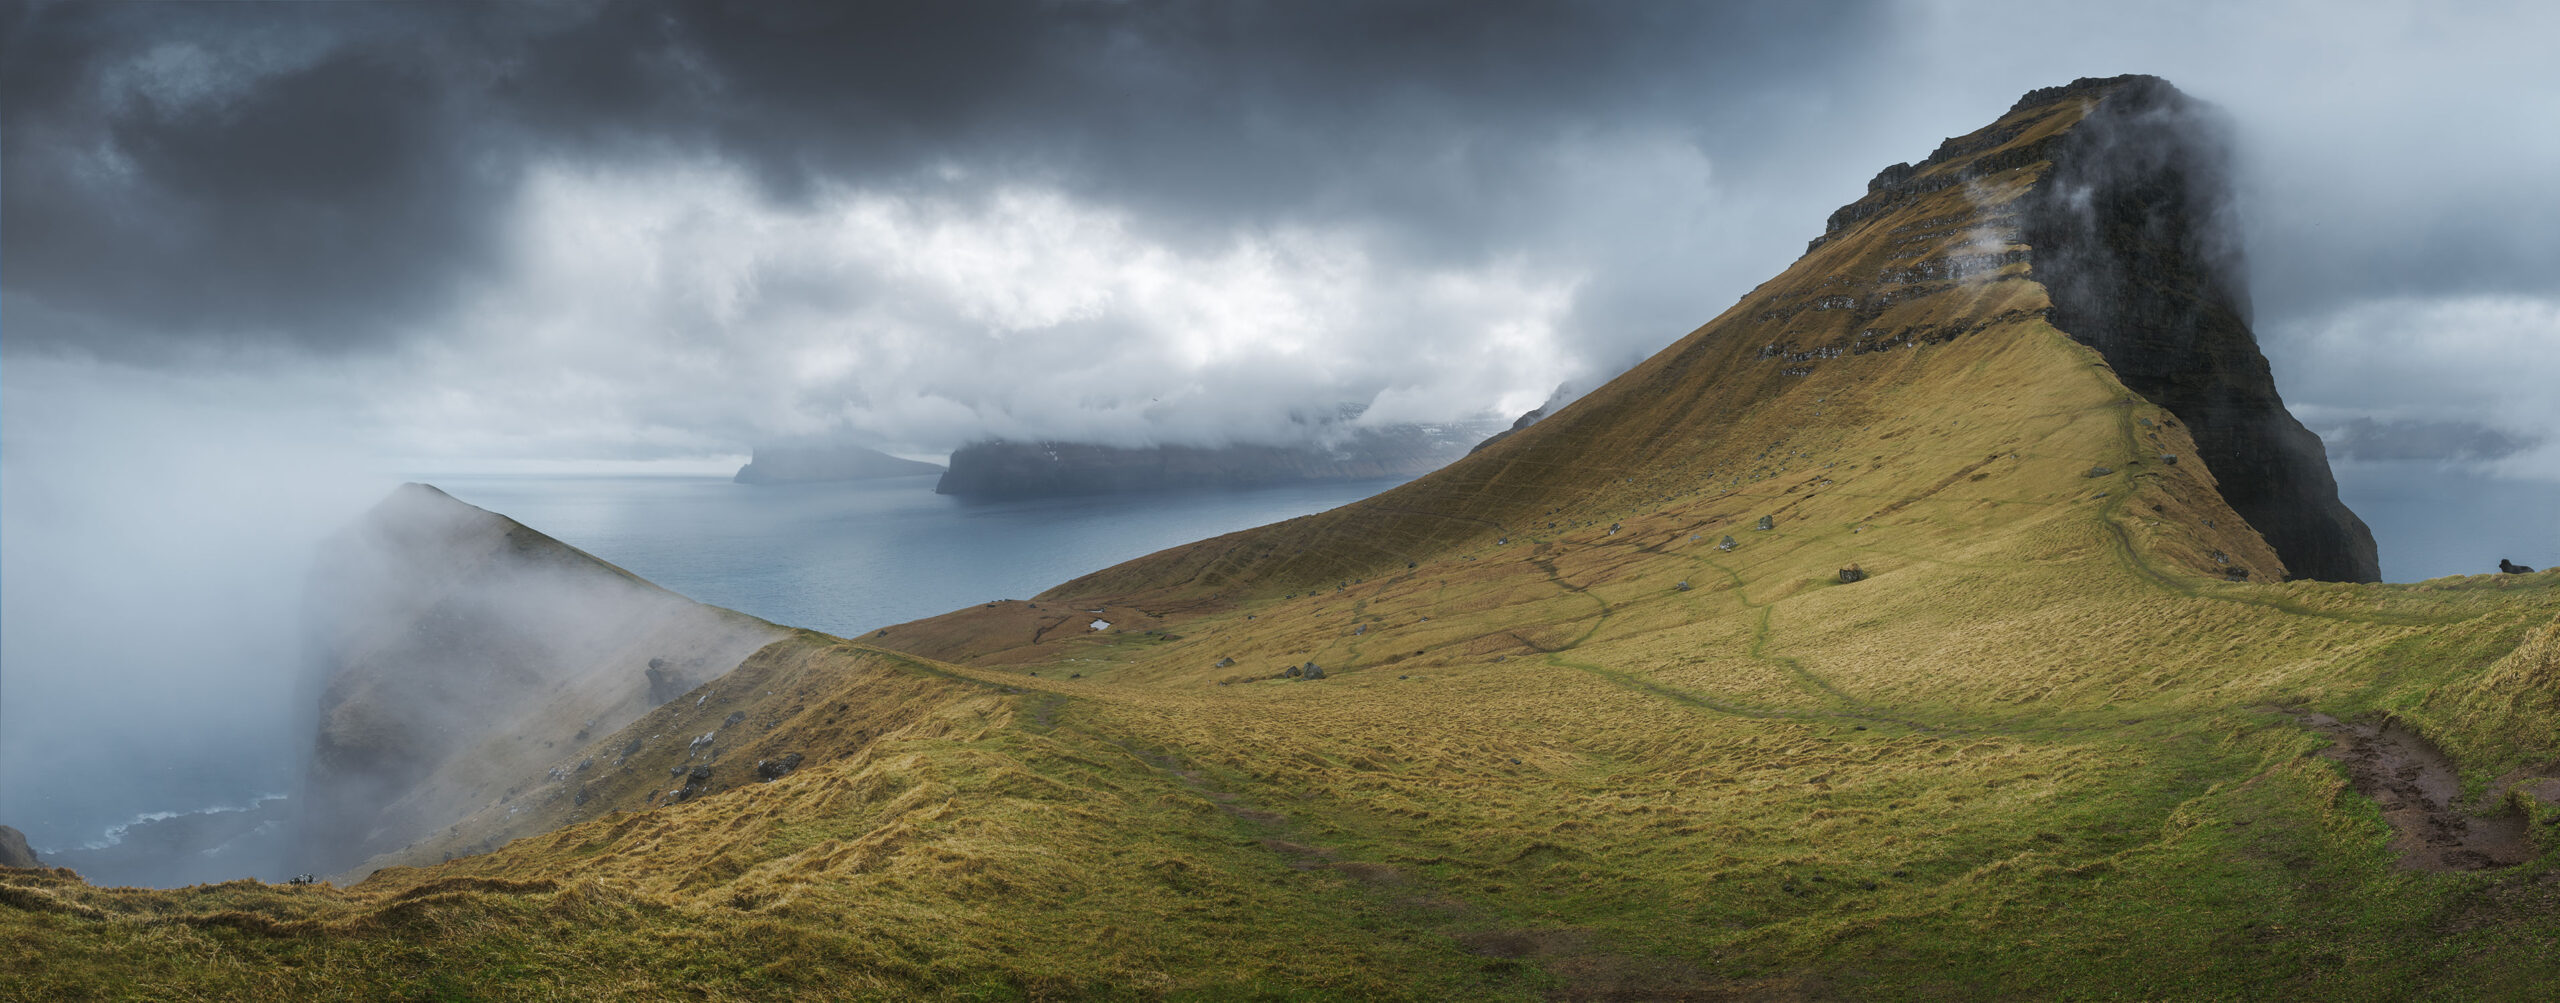
Kallur Lighthouse, Kalsoy Island
The long, narrow island of Kalsoy is home to one of the Faroe Islands’ most iconic landmarks: the Kallur Lighthouse. Perched at the northern tip of the island, this small lighthouse is surrounded by steep grassy cliffs and offers a 360-degree view over the islands of Viðoy and Eysturoy. It’s a dream location for any landscape photographer, where the scale of nature feels almost overwhelming.
How to get there
To reach Kalsoy, take the ferry from the town of Klaksvík on Borðoy Island. If you’re travelling by car, it’s best to arrive at the ferry terminal at least one hour in advance, as the boat is small and only takes a dozen vehicles.
Once on Kalsoy, drive to the village of Trøllanes. From there, a hike of 1 to 2 hours leads you to the lighthouse. The trail is not very difficult, but it can get muddy and slippery. I recommend bringing microspikes, especially after rain.
➜ Ferry schedule here
How I photographed this scene
At the top, the view is vast and cinematic. I used my tripod to make sure the images could be stitched together properly in Photoshop, and I made sure to overlap each vertical frame by about 30 percent. The final panorama shows the lighthouse surrounded by cliffs, with the sea stretching endlessly behind.
My gear
✅ Nikon D810
✅ Nikkor 24–70mm f/2.8
✅ Manfrotto tripod
Camera settings
ISO 125 – f/11 – 1/125 sec
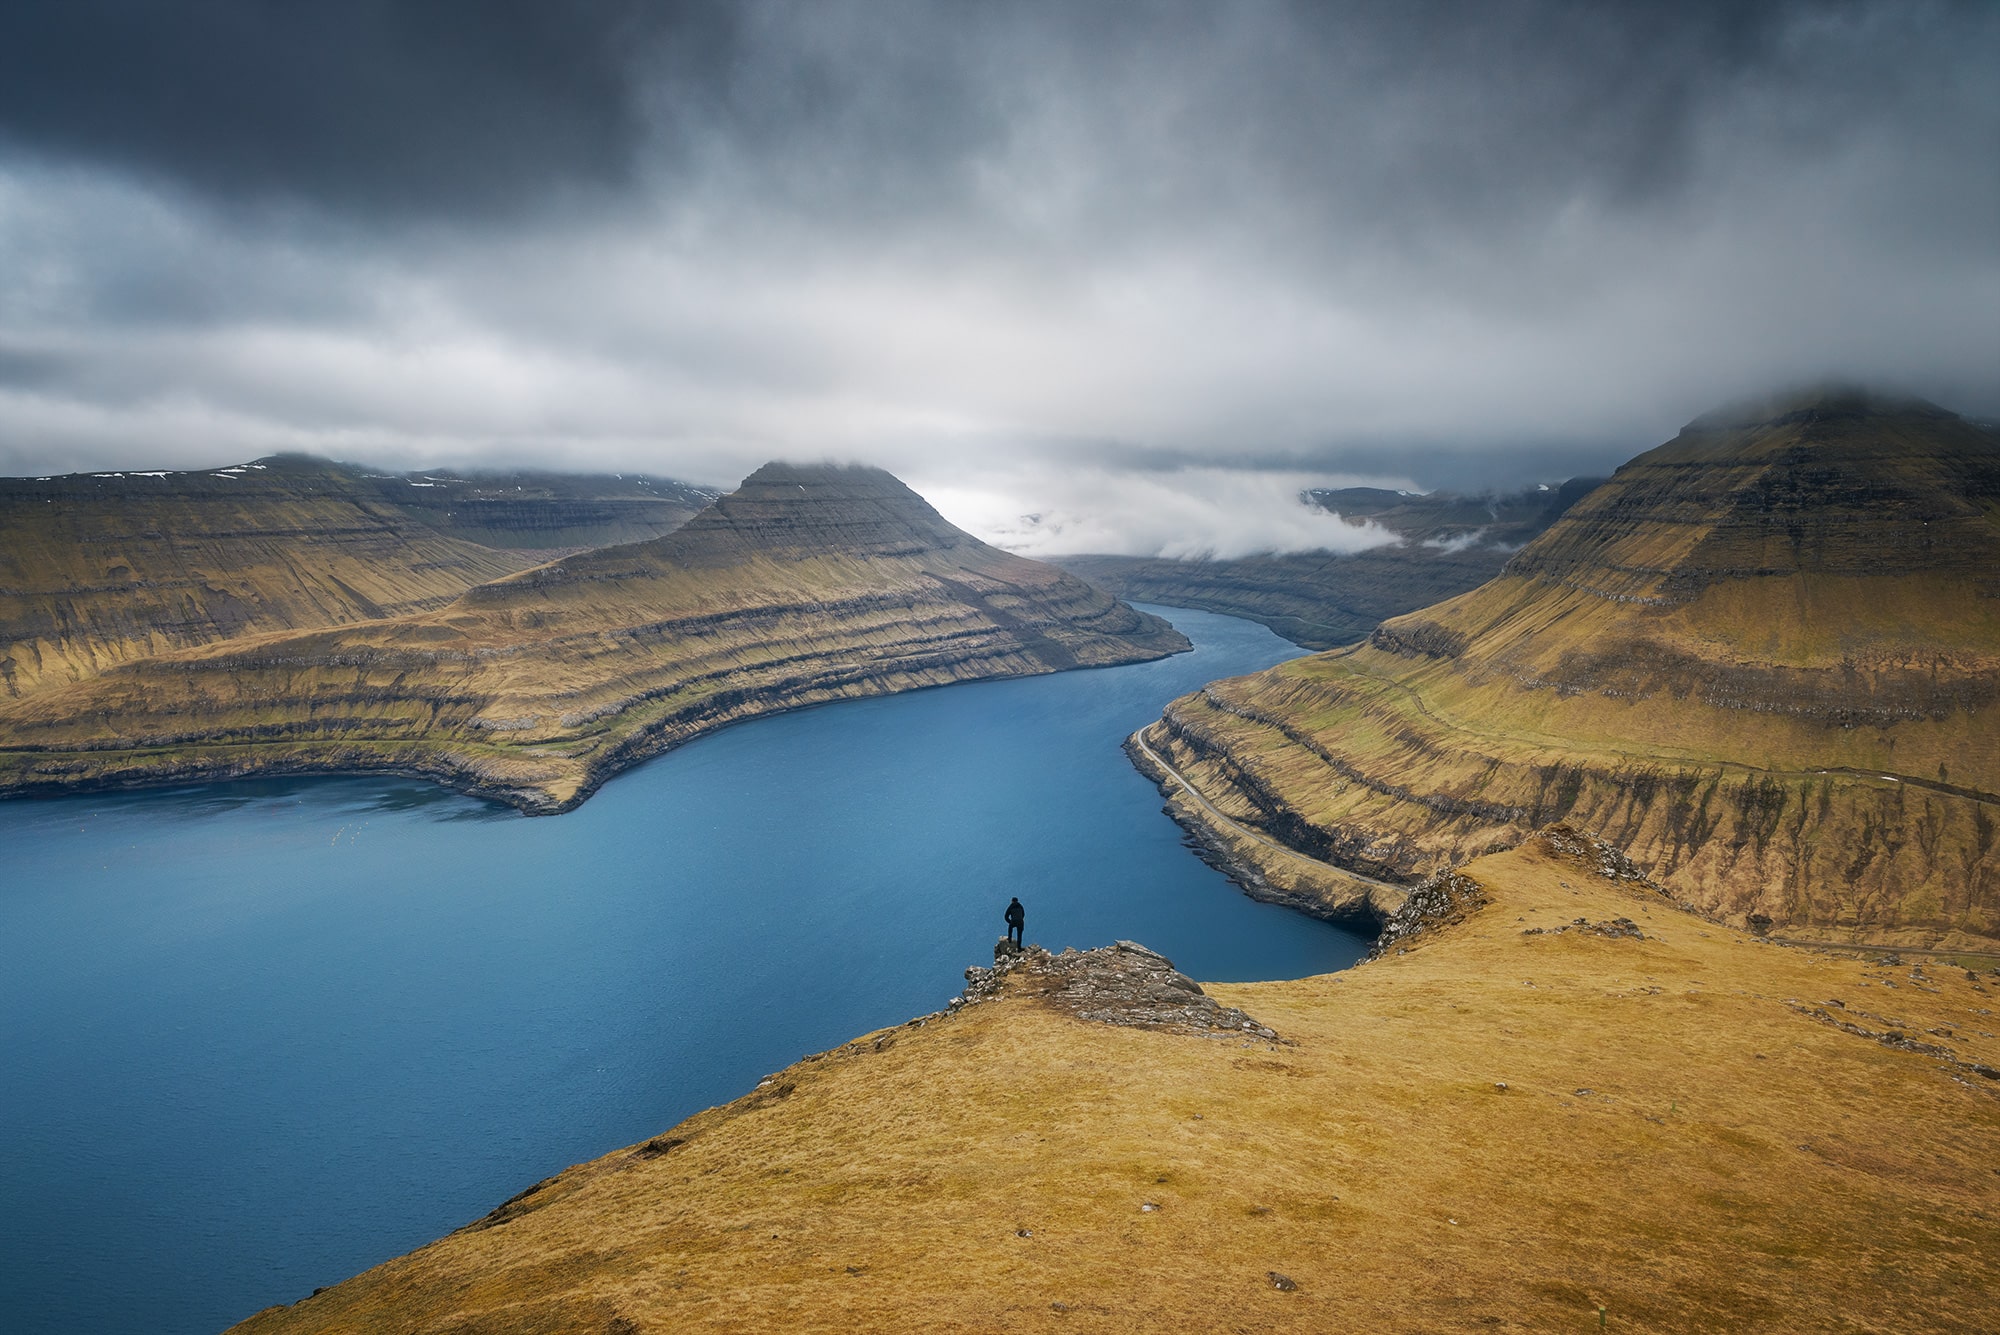
Hvithamar Viewpoint, Eysturoy Island
Hvíthamar is a spectacular viewpoint located between the villages of Funningur and Gjógv, on the island of Eysturoy. From the top, the view stretches across a deep fjord, with towering cliffs and winding roads below. It’s a place where scale and silence meet, perfect for creating dramatic compositions in landscape photography.
How to get there
On the road to Gjógv, look for the Gongutúrur / Hvithamar trailhead. There is a small parking lot just next to the start of the hike. From there, simply follow the signs to the top. The walk is relatively easy, with a flat start followed by a gentle climb. It takes about 1 hour to reach the summit.
➜ Hvithamar trailhead on Google Maps
How I photographed this scene
To emphasise the vastness of the landscape, I asked my friend to walk down to the lower plateau while I climbed to the top. His black silhouette stands out beautifully against the turquoise water and adds a sense of scale to the scene. I used my zoom lens to compress the perspective and isolate the key elements in the frame.
My gear
✅ Nikon D810
✅ Nikkor 24–70mm f/2.8
Camera settings
ISO 200 – f/13 – 1/125 sec
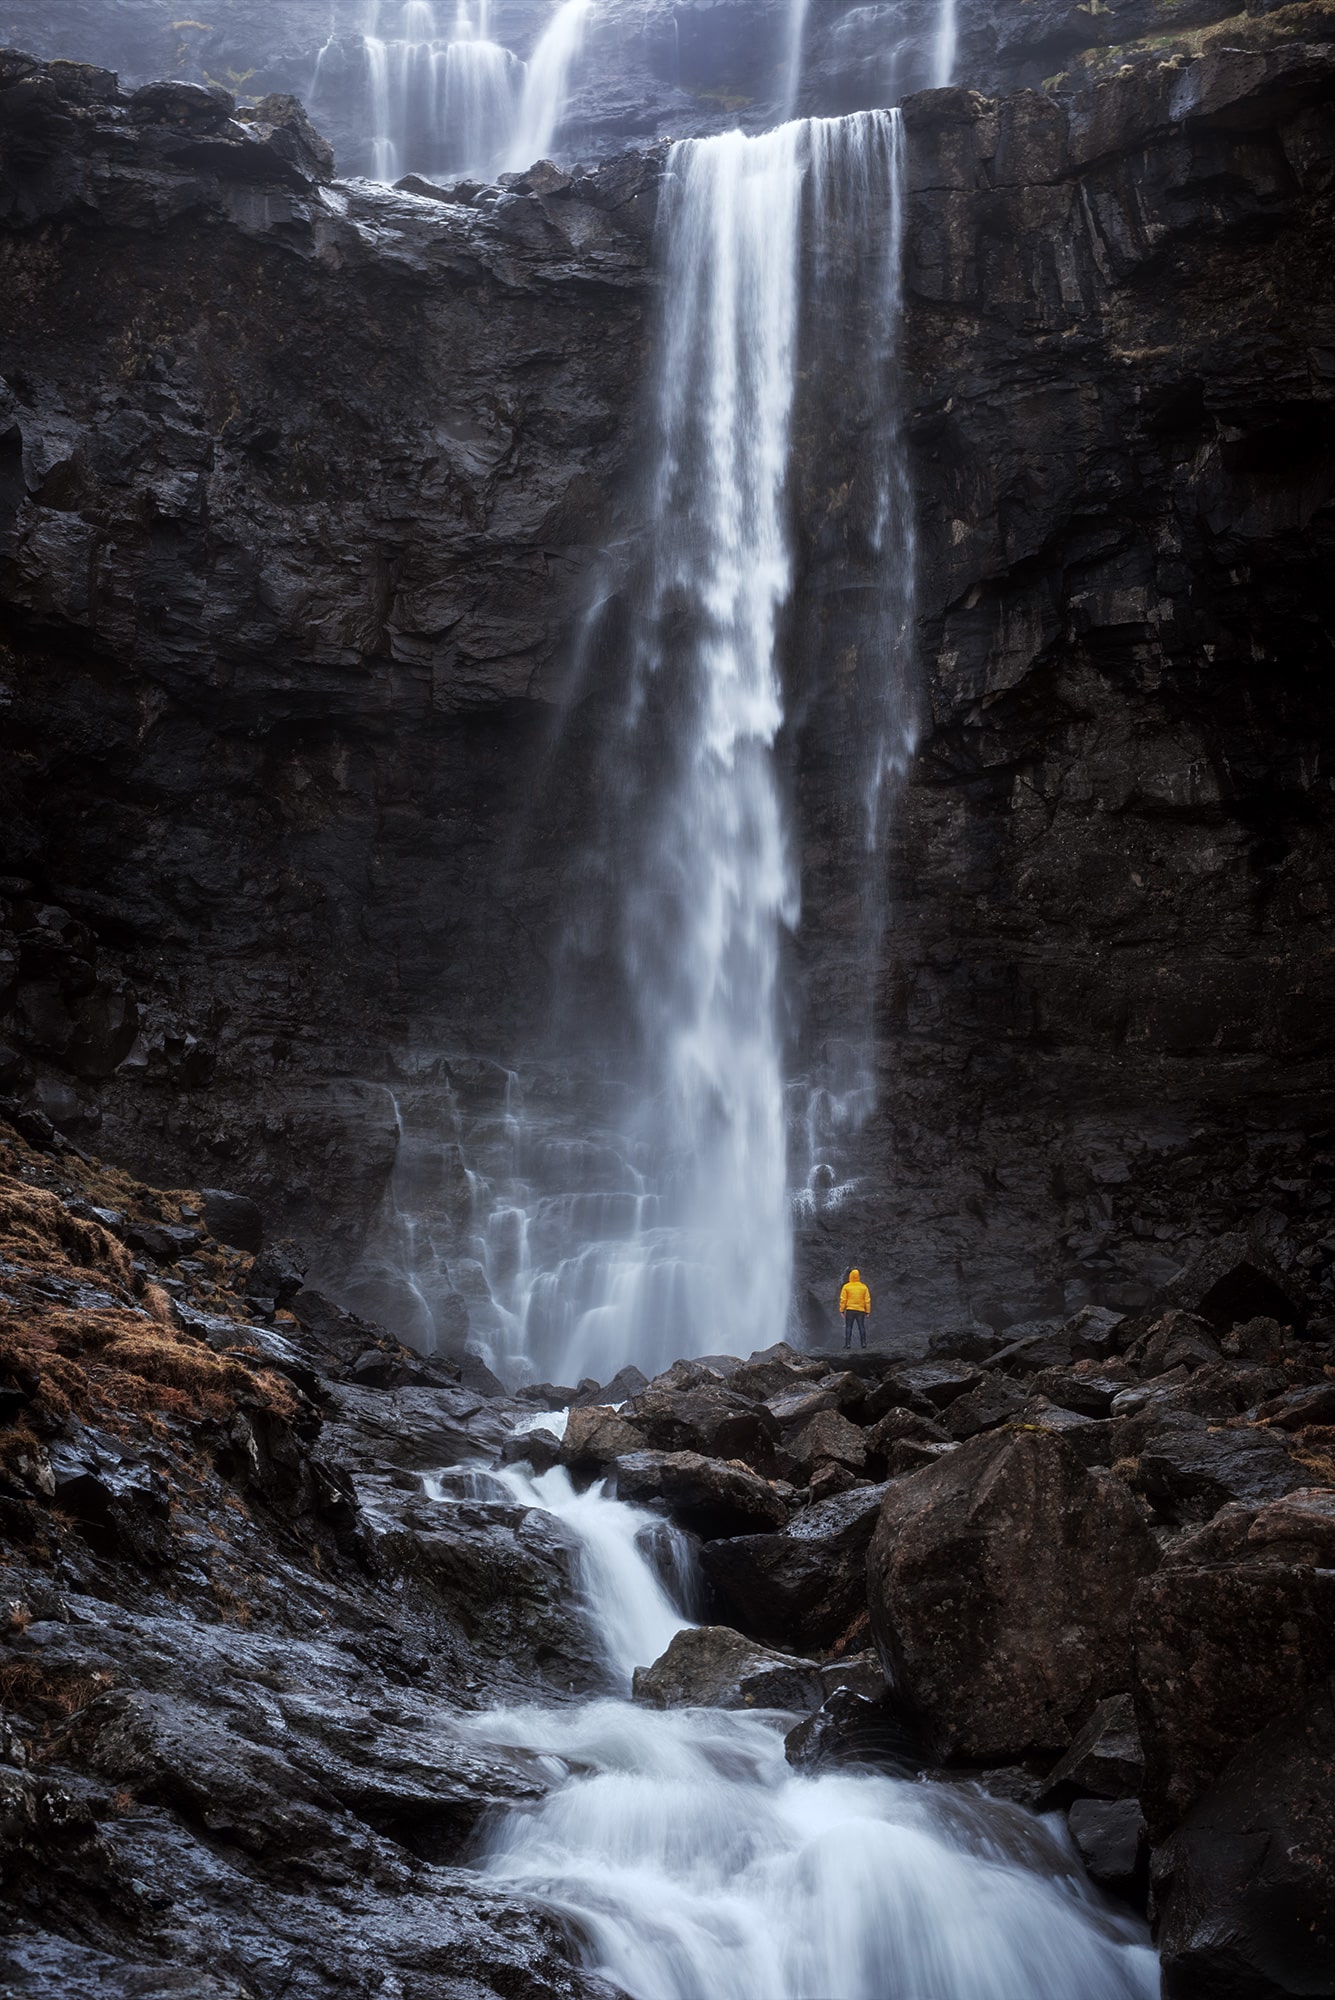
Fossá Waterfall, Streymoy Island
Fossá is the tallest and most iconic waterfall in the Faroe Islands. Located on the island of Streymoy, it cascades in two dramatic tiers down the mountainside before flowing into the sea. It is powerful, majestic, and very easy to access, a must-see for any landscape photographer visiting the Faroes.
How to get there
Fossá Waterfall is located in the north of Streymoy Island, near the village of Haldarsvík. It is clearly visible from the road. A small parking area is available just a few metres from the base of the waterfall. From there, you can walk right up to it or even climb a little higher to see the upper level.
➜ Fossá Waterfall parking on Google Maps
How I photographed this scene
I had envisioned this photo long before our trip. To create a sense of scale, I asked my friend to stand at the base of the waterfall, wearing a bright yellow raincoat we had brought along just for this shot. The splash of color against the grey rocks added a striking visual contrast.
Since I wanted both levels of the waterfall in the composition, I set up my tripod at a lower angle. This final image is a blend of two shots: one long exposure to blur the water, and one faster exposure to keep my friend sharp.
My gear
✅ Nikon D810
✅ Nikkor 80–200mm f/2.8
✅ ND filter 8
✅ Manfrotte tripod
Camera settings
Waterfall: ISO 160 – f/11 – 1/4 sec
Person with the yellow jacket : ISO 160 – f/11 – 1/50 sec
Plan your Faroese photo adventure
Want to dive deeper into these breathtaking locations? I created a detailed 7-day photography itinerary in the Faroe Islands based on my own trip. It includes more photo spots, useful tips, and daily guidance to help you capture the best light and atmosphere across the islands. Whether you’re visiting for the first time or returning for new inspiration, this guide will help you make the most of your time behind the lens.
Final thoughts
Thanks for reading this photographic journey through the Faroe Islands. Each of these six Faroe Islands photo spots left a lasting impression on me, with their raw beauty, quiet atmosphere, and dramatic light. Whether you are planning your own trip or simply dreaming of Nordic landscapes, I hope this guide to Faroe Islands photo spots has inspired you to explore, observe, and create.
And most of all, enjoy the moment. Happy shooting.
Published on September 28, 2023 by Jennifer Esseiva


